
Mastering Microsoft Entra Authentication Contexts – Part 1: What They Are, Why They Matter, and How to Use Them
- Sebastian F. Markdanner
- Aug 18, 2025
- 9 min read
Updated: Nov 3, 2025
Over my last few posts, I’ve casually mentioned Authentication Context a few times, so I thought it was about time we gave the feature a proper spotlight.

Within Microsoft Entra, we sometimes encounter scenarios where we need to enforce specific conditions for certain sub-actions or unique requirements.
While Conditional Access can directly enforce conditions in most cases, there are times when it’s trickier — especially if we want to enforce a condition for a single action or resource.
Enter Microsoft Entra Authentication Context — a global tag designed for exactly these situations.
Let’s jump in.
Table of Contents
What Are Microsoft Entra Authentication Context?
Short answer: A targetable tag in Conditional Access.
Long answer: An Authentication Context is a tag that can be applied to different resources within your organization, including (but not limited to) Protected Actions, Privileged Identity Management (PIM) roles, and Sensitivity Labels.
Once applied, the tag can be targeted in Conditional Access to provide greater granularity in policy enforcement — particularly useful for high-privilege scenarios.
Organizations can create up to 99 Authentication Contexts (IDs c1–c99). Each can be reused for any supported app, data type, or access point. A single context can also be targeted by multiple Conditional Access policies for users or workloads.
Licensing: Available with any license that includes Conditional Access, with a minimum of Microsoft Entra ID P1.
Using programmatically: You’ll need to add an additional claim (the acr claim) to your request:
# Claim added for authorization against Microsoft Entra
&claims=%7B%22access_token%22%3A%7B%22acrs%22%3A%7B%22essential%22%3Atrue%2C%22value%22%3A%22c1%22%7D%7D%7D

# Decoded acr claim
{"access_token":{"acrs":{"essential":true,"value":"c1"}}}
When a token includes the above claim, it authenticates against the Authentication Context with ID c1 and enforces the associated requirements.
Why Should We Use Microsoft Entra Authentication Context?
As with anything privileged, stricter requirements should be in place depending on the sensitivity or criticality of the access, action, or data.
Conditional Access is powerful, but it can lack the precision we sometimes need. For example: if a Global Administrator’s token is stolen and already contains a valid MFA claim, an attacker could reuse it to cause significant damage. By enforcing fresh tokens for a given action — possibly with specific authentication methods — we can help prevent both malicious attacks and accidental misconfigurations.
According to the European Union Agency for Cybersecurity (ENISA) 2024 Threat landscape report, ransomware remains one of the top threats. Attacks are becoming more sophisticated, with advances in evasion techniques and a rise in supply chain compromises — a dangerous combination.
This is especially damaging for SMBs. Microsoft reports that the average cost of a cyberattack in this segment is $254,445 — an amount many organizations simply can’t absorb.
In modern organizations, most (if not all) access is tied to identity-based solutions. Unfortunately, too many organizations focus only on the perimeter of identity security, without enforcing proper controls on what authenticated, privileged users can do.
Authentication Context helps close that gap by enforcing policies even for legitimate, authenticated, privileged users.
How To Manage Authentication Contexts In Entra
Managing authentication contexts are handled within the Microsoft Entra portal, where we can create and delete them.
Creating An Authentication Context
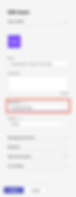
Navigate to the Entra portal → Conditional Access.

Select Authentication Context.
Click New authentication context to open the creation fly-out.

Add a Name and (optionally) a Description.
Select Publish to apps and choose the context ID. Save your changes.

You can now assign this context to apps, sites, actions, etc., and use it as a Target resource in Conditional Access policies. You can also target multiple contexts within the same policy.

Deleting An Authentication Context
To delete, navigate back to Authentication Context in Conditional Access, select the context, and choose Delete.

Tip: Removing a context also removes it from all linked policies — including Defender for Cloud Apps session policies, Conditional Access, Sensitivity Labels, and Protected Actions.
Deprecate related policies before deleting to avoid breaking functionality.
How To Setup Authentication Contexts In Across Resources
I’ve mentioned several areas where Authentication Contexts can be used. Let’s break them down one by one before we look at real-world examples in Part 2.
(Assumes Conditional Access policies are already created.)
Protected Actions
Protected Actions are specific Entra actions that require extra safeguards — even for admins with the right permissions. This helps prevent both accidental and malicious changes.
If you want a deeper look at protected actions, I've got an article on the feature here.
To enforce an Authentication Context on Protected Actions:
In the Entra portal, go to Roles & admins → Protected Actions → Add protected actions.

Select your desired Authentication Context and add actions for protection.

From then on, any attempt to perform these protected actions will trigger the extra requirements — even for authenticated users with permissions. Eg. when attempting to create a Conditional Access policy

Sensitivity Labels
Sensitivity Labels can be applied across multiple Microsoft 365 services to classify and protect data. For some services, they can also leverage Authentication Contexts — letting you enforce extra access conditions like requiring a managed device, specific authentication methods, or access from certain locations.
This is especially valuable for protecting highly sensitive information such as an organization’s intellectual property, personally identifiable information (PII), or payment data.
Important: Authentication Contexts aren’t universally supported across all resources that support Sensitivity Labels. The target resource must also support Authentication Context integration.
Currently supported apps:
Microsoft Office for the Web (including Outlook for the Web)
Microsoft Teams Desktop Client (Teams Web Client excluded)
Microsoft Planner
Microsoft 365 Apps for Word, Excel, and PowerPoint
Microsoft 365 Apps for Outlook
OneDrive
SharePoint
How to configure a Sensitivity Label with Authentication Context:
Navigate to the Purview portal, select Solutions → Information Protection → Sensitivity labels.
Click Create a label.

Enter a Name, Display name, and Description → Next.

Select the Scope for the label → Next.

Configure any additional protection settings you want applied with the label (or skip if not needed).

On the External sharing and Conditional Access step → Next.
(Optional) For enhanced security, you can also enable Privacy and external user access options.

Enable Use Microsoft Entra Conditional Access to protect labeled SharePoint sites.
Select an existing Authentication Context from the dropdown → Next.

Complete the wizard, then publish the label in a publish policy so it becomes available to users and admins.

Examples of security label assignment:
Teams
Microsoft Word for the Web

SharePoint Admin Site

Access from an unmanaged or non-compliant device
If the Sensitivity Label is assigned with a Conditional Access policy that requires a compliant or hybrid-joined device, any attempt to access the protected resource from an unmanaged or non-compliant device will result in the following error:

Direct SharePoint assignment without a label:
In some cases, you may want to apply an Authentication Context directly to a SharePoint site without using a Sensitivity Label. This can be done via PowerShell:
Set-SPOSite -identity https://<yourcompany>.sharepoint.com/sites/<siteName> -ConditionalAccessPolicy AuthenticationContext -AuthenticationContextName "<Authentication context display name>"Microsoft Defender for Cloud Apps
In our post-pandemic world, it’s a reality that organizations must account for employees accessing corporate applications and data from a variety of locations, devices, and times of day. As admins, one of our main goals is to deliver a great user experience while still protecting the organization. Fortunately, Microsoft Defender for Cloud Apps (MDCA) App Control in Conditional Access gives us several ways to achieve both.
MDCA allows us to enforce different policies for web sessions using Session Policies. These monitor active browser sessions and, based on defined rules, can block, monitor, or control the actions a user takes in real-time.
Note: Session Policies only monitor browser sessions — they do not apply to desktop applications.
One particularly useful capability is enforcing step-up authentication. This forces an active web session to be re-evaluated against a specified Authentication Context, triggering the associated Conditional Access requirements.
Example scenario
In my example, I require phishing-resistant authentication before allowing a user to download content from SharePoint on an unmanaged device.
Configuring step-up authentication in MDCA
Navigate to the Defender portal.
Expand Cloud apps → Policy management.
Click + Create policy → select Session policy.

Provide a Name, Severity, and Category.
For Session control type, select Control file download.
In the Activities filter:
Set Device tag to Does not equal → Intune compliant, Microsoft Entra Hybrid Joined, Valid client certificate.
Set App to SharePoint.

Under Actions, choose Require step-up authentication.
Select your Authentication Context.
Enable the Always apply the selected action even if data cannot be scanned setting.

Once this policy is in place, any user attempting to download documents from SharePoint on an unmanaged device will be prompted to complete phishing-resistant authentication before the action is allowed.
User experience:
Prompt: The user will see a sign-in requirement for additional security check(s).

After success: Access to download will be granted, and the action will now be allowed.

Known issues with MDCA Session policies
You may encounter an error message stating that “no conditional access policies have been found.”

To resolve this, you need to:
Add the Microsoft 365 App connector in the MDCA settings within the Defender portal.

Register Conditional Access App Control apps: Once the app connector is added, apps will be registered as users access them. You can monitor and manage these in MDCA settings.

Create a Conditional Access policy with App Control: Target the cloud app and use the session control Use Conditional Access App Control.

After waiting a Microsoft minute™️ the error should disappear, and you’ll be able to configure your custom Session Policy.
Privileged Identity Management
Assigning high-level permissions to users when they don’t need them goes against the principles of Zero Trust. Microsoft Entra Privileged Identity Management (PIM) helps solve this by allowing Entra roles, group memberships, and Azure resource permissions to be assigned just-in-time with automatic expiration.
That’s already a big security win — but we can make it even stronger by requiring an Authentication Context for role activation.
If you want more information I go through the feature in this bog post.
Why not just use MFA?
While MFA is effective in many cases, PIM’s MFA option does not enforce a new token; it simply reuses the current one if MFA has already been satisfied. This can be an issue, as it’s essentially “any valid token including MFA” rather than a fresh, context-specific check.
With an Authentication Context, we can force the user to meet specific Conditional Access requirements before activating a role.
Pro tip: PIM can be tedious when activating multiple roles with different requirements, especially if each triggers a re-authentication. To make life easier, I created a PowerShell module called PIMActivation — you can check it out here.
Enforcing Authentication Context for an Eligible Entra role
In the Entra portal, expand ID Governance → Privileged Identity Management.
Select Microsoft Entra roles under the Manage menu.

Click Settings, find the role you want to configure, and open it.

The main setting to note is On activation, require row, this shows whether the role requires None, Azure MFA or Authentication Context.
Click on Edit.

Select Microsoft Entra Conditional Access authentication context.
Choose your desired Authentication Context from the dropdown.
Save by clicking Update.

From then on, any user attempting to activate that role will need to meet the Conditional Access requirements tied to that Authentication Context.

Custom Applications
For a custom application to support Authentication Contexts, it must:
Be integrated with the Microsoft Identity Platform using either OpenID Connect or OAuth 2.0.
Be coded to handle Authentication Contexts, including collecting values and requirements via Microsoft Graph.
Dynamically process and enforce those requirements in its codebase.
If you’re looking for a developer-focused guide, as I'm far from a developer, I recommend this Microsoft Learn article: Microsoft Learn: Developer guide to Conditional Access authentication context.
Once the application is Authentication Context–aware, you can target it with Conditional Access policies in the same way as any Microsoft resource.
Wrapping It Up (For Now)
Microsoft Entra Authentication Contexts aren’t just another box to tick in Conditional Access — they’re a targeted, precision tool for controlling how, when, and under what conditions access is granted. Whether you’re locking down privileged role activations, protecting sensitive data, or requiring extra verification for specific high-impact actions, they give you the fine-grained control that broad CA policies can’t always deliver.
In this post, we covered the essentials — from what Authentication Contexts are, why you’d use them, and how to create them, to the supported resources and walkthroughs for putting them into action. Think of it as your foundation layer: you now have the knowledge to start building.
If this post set the stage, the next one’s the big performance.
And now for the mandatory bad joke of the day!
I told my firewall a joke...
It didn’t get through! 😎
Don’t Miss Part 2
We’ve covered the “what” and “how” — next up is the “now what?” In Part 2 of Mastering Microsoft Entra Authentication Contexts, we’ll jump into real-world scenarios, share ready-to-use Conditional Access policy examples, and give you best practices you can implement right away.
Subscribe, bookmark, or set a reminder — you won’t want to miss the step from theory to real-world application.
🔗 Authentication Context Series Index
Part 1: What They Are, Why They Matter, and How to Use Them (You're here!)
Part 3: Advanced Data Security