
Securing Microsoft Business Premium Part 04: Passwords Unlocked – Mastering Self-Service Password Reset and Password Protection
- Sebastian F. Markdanner

- Apr 3, 2025
- 15 min read
Updated: Mar 2
With authentication & authorization covered in the previous posts of the series, it's now time to dive into strengthening our password policies, empowering end-users, and enhancing overall password security.

As I've gone over previously, passwords aren't exactly bulletproof, but for many organizations, transitioning to a fully passwordless setup overnight isn't realistic. While we steadily work towards that passwordless dream, managing and securing passwords across the organization can cause significant friction and consume valuable time.
Enter Microsoft Entra Self-Service Password Reset (SSPR) and Password Protection, designed to streamline these processes and tackle common password-related issues head-on.
In this post, we'll explore these two powerful features, breaking down exactly what they offer and how to configure them effectively.
Table of Contents
Microsoft Entra Password Protection
Conclusion: Passwords Unlocked – Enhancing Security and Empowering Users
Password Resets: The Biggest Headache in IT Support
Whenever I speak with professionals in the SMB space about their top IT support headaches, password resets have a consistently hard grip on being ranked number one.
Ideally, we'd eliminate passwords entirely, moving towards more secure and efficient solutions. However, the reality is that many businesses continue to rely heavily on passwords.
Empowering users with the ability to reset their own passwords—whether in a cloud-native or hybrid environment—and implementing a robust, point-based password evaluation system offers the best of both worlds. This approach significantly reduces downtime for end-users, boosts productivity, and simultaneously lessens the burden on the helpdesk team.
When done right, everyone from users to admins and even C-Level executives will appreciate the noticeable improvements in efficiency and user experience.
Microsoft Entra Self-Service Password Reset
Understanding Self-Service Password Reset (SSPR)
Let's face it—password resets are a hassle.
Users waste time requesting resets, and IT helpdesk teams lose valuable time that could be spent tackling more interesting issues.
That's exactly why Self-Service Password Reset (SSPR) exists. SSPR empowers both non-privileged end-users as well as admins to reset or change their own passwords and even unblock their accounts independently, significantly speeding up their return to productivity in both cloud-only and hybrid environments.
An added bonus: SSPR integrates seamlessly with Microsoft Entra Password Protection policies, ensuring robust password standards even during self-service resets.
As discussed earlier in this series, our ultimate goal is achieving a fully passwordless environment, which would naturally eliminate the need for SSPR altogether. Stay tuned—I'll cover the path to passwordless in an upcoming post.
Self-Service Password Reset Flow
The SSPR process kicks off when a user accesses the SSPR portal directly or selects the "Can't access your account?" link on the sign-in page. The user then undergoes a series of checks before accessing the reset functionality.
Here's an overview of the SSPR flow:

Microsoft Entra Self-Service Password Reset Policy for Admin accounts
SSPR is enforced by default for privileged users with admin roles, requiring two authentication methods for enhanced security. Security questions are prohibited for admin accounts, regardless of the general SSPR authentication method configurations.
The admin policy doesn't use the combined authentication methods, and isn't available for modifications.
Admin users have these authentication options available:
Microsoft Authenticator notification
Microsoft Authenticator code
Third-party software OATH tokens
Voice calls
Email OTP
Ensure these methods are configured by the admin users at aka.ms/mfasetup.
If your organization uses phishing-resistant authentication or has fully adopted passwordless methods for privileged users, you might want to disable the default SSPR admin policy. You can easily do this using PowerShell:
# Installing and importing the required module
Install-Module Microsoft.Graph.Identity.SignIns
Import-Module Microsoft.Graph.Identity.SignIns

# Authenticating to Microsoft Graph
Connect-MgGraph

# Disabling SSPR for Admin accounts
Update-MgPolicyAuthorizationPolicy -AllowedToUseSspr $false
Microsoft Entra Self-Service Password Reset Policy for endusers
For non-admin users, SSPR uses unified Authentication Methods policies (as covered in Part 02). By default, one authentication method is required, but you can easily configure it to require two methods. Additionally, security questions are an available option for non-admin users.
If your environment hasn't yet migrated to unified Authentication Methods, you can still configure SSPR independently.
These are the available authentication methods:
Mobile app notification
Mobile app code
Email
Mobile phone
Office phone
Security questions
Microsoft Entra Self-Service Password Reset Policy for B2B Collaborators
When it comes to SSPR for collaborators in your tenant, the options vary depending on how the user was created or granted access.
Here’s a quick overview of the supported SSPR scenarios:
Self-Service Sign-up Users (Non-Entra Identities)
These users are typically created via Custom User Flows, allowing users to create their own guest account, or through B2B collaboration settings and Access Packages.
Users who signed up themselves can easily use SSPR with the email they initially registered.
But hold your horses—SSPR does NOT support Personal Microsoft accounts (e.g., @outlook.com, @hotmail.com).
Entra Identities
Collaborators coming from another Microsoft Entra tenant will have their password resets stay cozy at home—managed directly within their home tenant.
This does require that SSPR is available in their home tenant
How to configure Microsoft Entra SSPR
Now that we’re familiar with the flow and how different types of users interact with SSPR, let’s dive right into configuring the feature.
Configuring SSPR - Cloud only environment
Let’s kick things off with the configuration steps for a cloud-only setup:
Set the Scope
Navigate to the Microsoft Entra portal, go to the Protection blade, select Password reset, and adjust the scope of SSPR to meet your organization’s requirements.

Authentication Methods Requirements
Under Authentication methods and update the requirements as needed.
Depending on your environments migration state, methods are either managed here directly, or via the unified Authentication Methods policies.

Registration Settings
In the Registration menu, you can tweak how frequently users need to reconfirm their authentication details. You can set this interval between 0–730 days.
Setting it to 0 completely disables re-confirmation.

Enable Notifications
From the Notifications menu, turning on notifications ensures users automatically receive an email after completing a password reset.
For end users, the policy first attempts to send emails to their primary and alternative emails. If none exist, it’ll default to their User Principal Name (UPN).
For admins, an email notification will be sent to users with the Global Administrator role.
This is especially useful—providing visibility into privileged user activities, enabling swift action if suspicious behavior arises.
Ideally, these privileged accounts shouldn’t consume licenses. To still receive emails without licensing them, use Plus Addressing.

Customization
Finally, under Customization, enhance the user experience by adding a direct link to your helpdesk portal or specifying a custom helpdesk email address.
If a custom email address is provided here, the admin notification emails will also route to this address.

And there you have it—a straightforward setup for SSPR in a cloud-only environment. Easy, efficient, and ready for action!
Configuring SSPR - Hybrid environment
When you’re working in a hybrid setup with on-premises Active Directory, there are a few extra steps to take—but don’t worry, they don’t change the core SSPR configuration we just covered.
To enable hybrid SSPR, you’ll need either Microsoft Entra Connect or Cloud Sync deployed. (Stay tuned—I’ll dive into both options in a future blog post!)
Here are the additional steps:
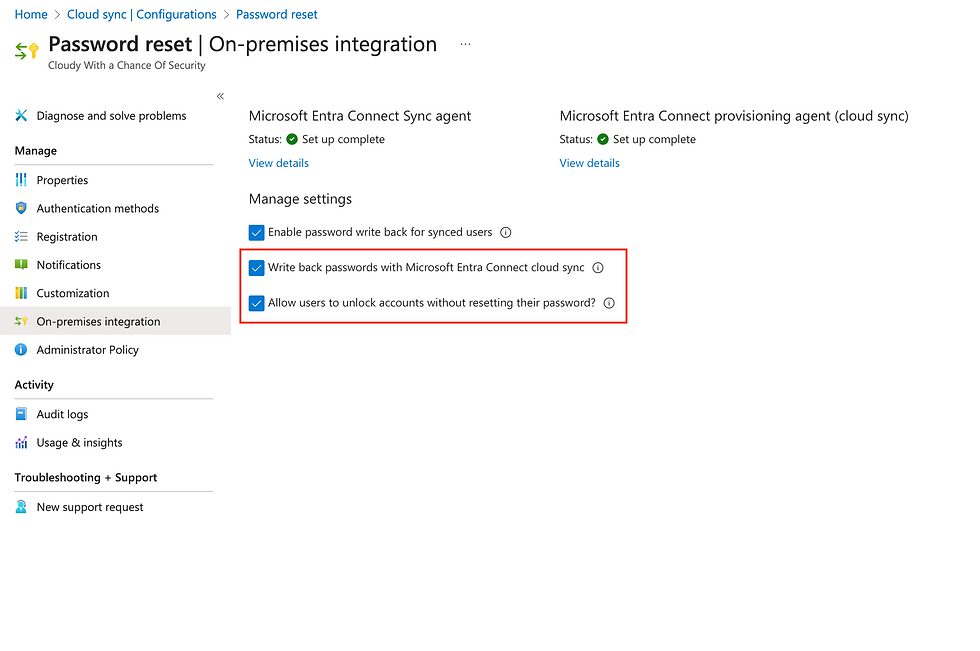
On-premises integration
In the Password reset menu of the Entra portal, head to the On-premises integration section.

Configuring On-premises Integration
Ensure these settings are enabled:
Enable password write back for synced users - Required for allowing SSPR to write passwords back to on-prem AD.
Write back passwords with Microsoft Entra cloud sync - Required if you’re using Cloud Sync with a provisioning agent.
Allow users to unlock accounts without resetting their passwords? - Optional, but highly recommended for better UX and fewer password reset requests. It also helps reduce password reuse and insecure password practices.
Running Microsoft Entra Cloud Sync, that's all you'll have to configure. For Microsoft Entra Connect there's some additional configuration on-premises.
Configuring Microsoft Entra Connect On the server running Microsoft Entra Connect, open the Entra Connect wizard and navigate to Customize synchronization options.
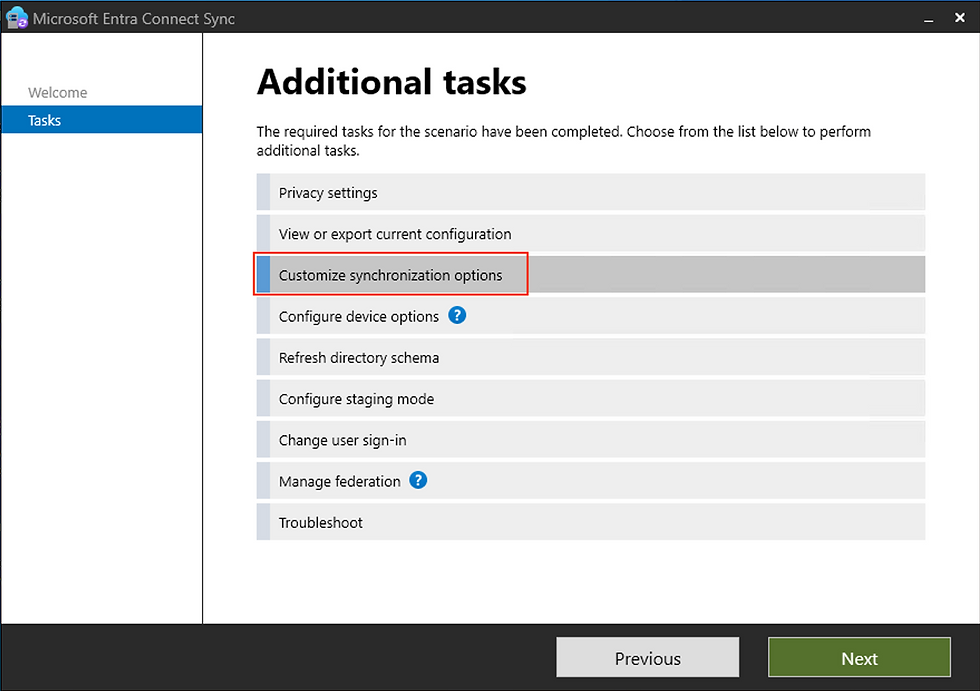
Enable Password Writeback
During the guided setup, when you reach Optional features, make sure Password writeback is enabled.
After that, don’t forget to run a sync job to apply the changes.

With these hybrid configurations in place, your users will have more control over their own access—which means fewer helpdesk tickets and a smoother experience for everyone involved.
Microsoft Entra Password Protection
Now that we’ve empowered users to reset their passwords, it’s time to make sure those passwords aren’t, well… garbage.
Microsoft Entra Password Protection helps shield your environment from common attacks—especially brute force tactics like dictionary attacks and credential stuffing which I broke down more in Part 02 of this series.
Understanding Microsoft Entra Password Protection
To strengthen password security, Microsoft Entra uses Password Protection by default for cloud identities, leveraging Microsoft’s Global Banned Passwords List—a constantly updated list based on real-world data.
The global banned list is not publicly available, by design, to maintain its effectiveness against attackers.
To further enhance protection, organizations can configure a custom banned passwords list. This allows you to block business-specific terms that may weaken password strength if used.
Common candidates for the custom list include:
Brand names
Product names
Office or site locations
Internal project names or terminology
Abbreviations or acronyms used within the organization
Example:

With a custom banned passwords list in place, password validation uses the combined list of global and custom entries.
Note: Custom banned password entries must be between 4–16 characters, with a maximum of 1,000 words in total.
For cloud-only identities, no further configuration is needed beyond setting up your custom list.
However, hybrid identities synced from on-premises are not natively covered. To apply Password Protection to those users, additional setup is required—which we’ll cover shortly.
Protection Against Password Spray Attacks
Microsoft’s analysis of real-world attack data directly informs the Global Banned Passwords List. As a result, the system automatically blocks many weak and commonly used passwords that are frequently seen in password spray attacks.
Unlike third-party lists that may include millions of potential passwords, Microsoft focuses on quality over quantity, continuously refining the list based on actual attacks observed across its services.
What is a Password Spray Attack?
Password spray attacks are a form of brute force attack—but with a twist.
While traditional brute force relies on large credential dumps or trying many password combinations against a single user, password spray attacks flip the script. The attacker tries a small number of commonly used passwords across a large number of accounts, looking for one weak link.
This approach is much quieter and often evades detection. Since only a few attempts are made per account, it can look like normal user error rather than an attack—making it both subtle and effective.
Password Evaluation
It’s great to have both the global and custom banned passwords lists in place—but how exactly are they used during password validation?
Microsoft Entra Password Protection evaluates passwords using a point-based system. But before that happens, the password needs to meet some basic requirements.
Base password requirements
Before evaluation begins, the password must comply with the password policy enforced for the user.
Cloud Identities
Cloud users follow the Microsoft Entra password policy, which includes the following:
Property | Requirements |
|---|---|
Characters allowed | Uppercase characters (A - Z) Lowercase characters (a - z) Numbers (0 - 9) Symbols:
|
Characters not allowed | Unicode characters |
Password length | Passwords require
|
Password complexity | Passwords require three out of four of the following categories:
|
Password not recently used | When a user changes their password, the new password shouldn't be the same as the current password. |
Hybrid Identities
For hybrid users, the on-premises AD DS password policy is enforced by default.
However, you can enforce the Microsoft Entra password policy during SSPR in the cloud for synchronized users by enabling a specific setting:
$OnPremSync = Get-MgDirectoryOnPremiseSynchronization
$OnPremSync.Features.CloudPasswordPolicyForPasswordSyncedUsersEnabled = $true
Update-MgDirectoryOnPremiseSynchronization -OnPremSync $OnPremSync
This ensures that synced users benefit from the same complexity and banned word checks as cloud-native users during self-service resets.
Normalization
The first step in password evaluation is normalization. This process converts special characters, numbers, and letter substitutions into a standard format. The goal is to detect weak or common passwords—especially those resembling entries in the global or custom banned passwords lists.
Note that normalization does not affect the complexity fulfillment in the original input.
Examples:
Input | Normalized |
|---|---|
Ch4nc3 | chance |
$3cur!tY | security |
L@mbCh0p | lambchop |
@lP!n3 | alpine |
Point-based password validation
Rather than simply rejecting passwords with banned terms, Microsoft Entra uses a point-based system.
Each password must earn at least 5 points to be considered valid.
Point Rules:
Each character (letter, number, symbol) = 1 point
Each banned word (in the combined list) = 1 point
This approach allows flexibility—for example, users can still include business terms or brand names in passwords, provided the overall complexity compensates.
Substring matching
Microsoft Entra evaluates normalized passwords for direct matches against the user’s first name, last name, or the tenant name. If any are found, the password is automatically rejected.
Example:
Input | After normalization | Evaluation state |
|---|---|---|
MyCh@nc3W!thK4thy | mychancewithkathy | Pass – includes “chance”, but no user or tenant info |
MyCh@nc3W!th$eb4st!an | mychancewithsebastian | Fail – contains the user’s first name (“sebastian”) |
Fuzzy matching
Fuzzy matching detects near matches to banned words using an edit distance of 1—meaning one character can be added, removed, or changed.
Example:
For the banned word chance, fuzzy matching would catch:
chanc - trailing e have been deleted
hance - leading c have been deleted
shance - leading c have been changed to s
chnce - middle a have been deleted
These variations still count as banned and each will add 1 point during evaluation, due to being within the edit distance.
Score Calculation Examples
When a password is set, reset or changed it'll be evaluated using the point-system.
Let's take a look at a few different examples to see how they are scored:
Example 1:
Input: MyCh@nc3W!thK4thy
Normalized: mychancewithkathy
Points: [m] + [y] + [chance] + [w] + [i] + [t] + [h] + [k] + [a] + [t] + [y] = 11 points
Result: Pass
Example 2:
Input: S3b@C4nce2!
Normalized: seb@cance2!
Points: [s] + [e] + [b] + [@] + [cance] + [2] + [!] = 7 points
Result: Pass
Example 3:
Input: Ch@nc30fS3cur!ty
Normalized: chanceofsecurity
Points: [chance] + [o] + [f] + [security] = 4 points
Result: Fail
Example 4:
Input: S3cur!ty$ecru!ty1!
Normalized: securitysecurity1!
Points: [security] + [security] + [1] + [!] = 4 points
Result: Fail
Deploying Microsoft Entra Password Protection On-Premises
To use Microsoft Entra Password Protection in a hybrid environment, you’ll need to deploy the feature on-premises.
Important: Always deploy in Audit mode for at least 30 days (preferably 90) before enforcing. This gives you time to review activity, monitor impact, and resolve any automation or integration issues.
The diagram below illustrates how the components interact in an on-premises deployment:

Used with permission from Microsoft. Source: Microsoft Learn: On-premises Password Protection?
Key Components and Considerations
To deploy Microsoft Entra Password Protection on-premises, two components are required:
DC Agent (Domain Controllers)
The DC agent must be installed on every domain controller. It’s responsible for evaluating password changes locally using the most recent password policy.
The policy is downloaded from Microsoft Entra at startup, then refreshed hourly.
The policy is stored in SYSVOL and replicated across domain controllers using DFSR.
This ensures consistent enforcement, even if internet access is temporarily unavailable.
Without the DC agent installed on all domain controllers, password changes on unprotected DCs will bypass evaluation.
Proxy Agent (Member Servers)
The proxy agent must be installed more than one member servers.
The proxy agent handles outbound communication with Microsoft Entra.
DC agents contact the proxy, which then forwards policy requests to Entra and returns the response.
No password data or policy content is stored or cached on these servers.
For resilience, install the proxy agent on at least two member servers. All DCs must be able to reach the proxy via RPC over TCP.
Before moving to installation steps, be sure to download the latest DC and Proxy agent installers from the Microsoft download center
Deploying Microsoft Entra Password Protection Proxy Agent
This section covers how to deploy the Password Protection Proxy Agent using the default setup. If your environment requires custom ports, utilizes third-party firewalls or password filters, those configurations are outside the scope of this guide.
Minimum Requirements
Windows Server 2012R2 or later
TLS 1.2
.NET 4.7.2
4 GB Ram
2 CPU cores
Installation Steps:
Download & run the installer
On your selected member servers, download and run the AzureADPasswordProtectionProxySetup.exe
The installation can be done manually or programmatically and does not require a reboot.

Register the proxy and the forest
Use PowerShell to register both the proxy server and the forest.
To simplify the process, I’ve created a script that handles the following:
Proxy registration
Forest registration
Health checks before and after
Error handling and validation
You can find the powershell script below, or on GitHub:
Automation powershell script
<#
.SYNOPSIS
    Registers and validates an Microsoft Entra Password Protection Proxy server.

.DESCRIPTION
    This script automates the registration process for an Microsoft Entra Password Protection Proxy server
    and performs health checks before and after the registration. It handles both proxy and forest
    registration, with validation steps in between.

.PARAMETER AccountUpn
    The User Principal Name (UPN) of the account used for registration.
    Must be in email format (e.g., admin@contoso.com).
    The account must have Global Administrator privileges.

.NOTES
    File Name      : Register-EntraPasswordProtProxy.ps1
    Author         : Sebastian Flæng Markdanner
    Website        : https://chanceofsecurity.com
    Prerequisite   : Microsoft Entra Password Protection Proxy installed
    Version        : 1.0.1
    Creation Date  : 2024-03-31

.EXAMPLE
    .\Register-EntraPasswordProtProxy.ps1 -AccountUpn "admin@contoso.com"
    Registers the proxy server using the specified admin account.

#>

# Parameters
[CmdletBinding()]
param(
    [Parameter(Mandatory = $true)]
    [ValidatePattern('^[\w-\.]+@([\w-]+\.)+[\w-]{2,4}$')]
    [string]$AccountUpn
)

# Module import with error handling
try {
    Import-Module AzureADPasswordProtection -ErrorAction Stop
    Write-Host "[INFO] Successfully imported AzureADPasswordProtection module." -ForegroundColor Green
} catch {
    Write-Host "[ERROR] Unable to import AzureADPasswordProtection module. Please ensure it is installed." -ForegroundColor Red
    Write-Host "[ERROR] Exception: $($_.Exception.Message)" -ForegroundColor Red
    exit 1
}

# Check if the Proxy service is running
try {
    $service = Get-Service AzureADPasswordProtectionProxy -ErrorAction Stop
    if ($service.Status -eq 'Running') {
        Write-Host "[INFO] AzureADPasswordProtectionProxy service is running. Proceeding with Proxy registration..." -ForegroundColor Green
        try {
            Register-AzureADPasswordProtectionProxy -AccountUpn $AccountUpn -ErrorAction Stop
            Write-Host "[INFO] Proxy registration successful." -ForegroundColor Green
        } catch {
            Write-Host "[ERROR] Failed to register proxy: $($_.Exception.Message)" -ForegroundColor Red
            exit 1
        }
    } else {
        Write-Host "[ERROR] AzureADPasswordProtectionProxy service is not running. Please start the service and try again." -ForegroundColor Red
        exit 1
    }
} catch {
    Write-Host "[ERROR] Failed to check service status: $($_.Exception.Message)" -ForegroundColor Red
    exit 1
}

# Wait 2 seconds for the registration to take effect
Write-Host "[INFO] Waiting for registration to take effect..." -ForegroundColor Yellow
Start-Sleep -Seconds 2

# Test Proxy Health and display errors if any
try {
    $healthResult = Test-AzureADPasswordProtectionProxyHealth -TestAll -ErrorAction Stop
    $failedTests = $healthResult | Where-Object { $_.Result -ne 'Passed' }
    if ($failedTests) {
        Write-Host "[ERROR] Proxy health check failed. Failed tests:" -ForegroundColor Red
        $failedTests | Format-Table
        exit 1
    } else {
        Write-Host "[INFO] All proxy health checks passed." -ForegroundColor Green
    }
} catch {
    Write-Host "[ERROR] Failed to run health checks: $($_.Exception.Message)" -ForegroundColor Red
    exit 1
}

# If Proxy health is good, register the forest
try {
    Register-AzureADPasswordProtectionForest -AccountUpn $AccountUpn -ErrorAction Stop
    Write-Host "[INFO] Forest registration initiated successfully." -ForegroundColor Green
} catch {
    Write-Host "[ERROR] Failed to register forest: $($_.Exception.Message)" -ForegroundColor Red
    exit 1
}

# Wait 2 seconds for the forest registration to settle
Write-Host "[INFO] Waiting for forest registration to settle..." -ForegroundColor Yellow
Start-Sleep -Seconds 2

# Final Proxy Health Test
try {
    $finalHealthResult = Test-AzureADPasswordProtectionProxyHealth -TestAll -ErrorAction Stop
    $failedFinalTests = $finalHealthResult | Where-Object { $_.Result -ne 'Passed' }
    if ($failedFinalTests) {
        Write-Host "[ERROR] Final health check failed. Failed tests:" -ForegroundColor Red
        $failedFinalTests | Format-Table
        exit 1
    } else {
        Write-Host "[SUCCESS] Final health check passed. Registration complete." -ForegroundColor Green
        exit 0
    }
} catch {
    Write-Host "[ERROR] Failed to run final health checks: $($_.Exception.Message)" -ForegroundColor Red
    exit 1
}
Once registered, the proxy agent becomes available to any domain controller that can establish a connection.
Deploying Microsoft Entra Password Protection DC Agent
Unlike the proxy agent, the DC agent does not require registration. Installation is straightforward:
Download and run the AzureADPasswordProtectionDCAgentSetup.msi on each domain controller.
Reboot the server after installation. This is required for the DC to request and apply the current password policy from Microsoft Entra.
I want to emphasize once more that as the DC agent performs password evaluation locally it must be installed on every domain controller to ensure consistent enforcement.
Monitoring On-premises Password Evaluations
Once the agents are deployed and policies are active, evaluation events are logged on the domain controller where the password operation occurred.
Logs are located at:
Applications and Services Logs\Microsoft\AzureADPasswordProtection\DCAgent\Admin

Key Events to Monitor
Event | Password change | Password set |
|---|---|---|
Pass | 10014 | 10015 |
Fail (due to customer password policy) | 10016, 30002 | 10017, 30003 |
Fail (due to Microsoft password policy) | 10016, 30004 | 10017, 30005 |
Fail (due to combined Microsoft and customer password policies) | 10016, 30026 | 10017, 30027 |
Fail (due to user name) | 10016, 30021 | 10017, 30022 |
Audit-only Pass (would have failed customer password policy) | 10024, 30008 | 10025, 30007 |
Audit-only Pass (would have failed Microsoft password policy) | 10024, 30010 | 10025, 30009 |
Audit-only Pass (would have failed combined Microsoft and customer password policies) | 10024, 30028 | 10025, 30029 |
Audit-only Pass (would have failed due to user name) | 10016, 30024 | 10017, 30023 |
Monitoring can be done manually or streamed to a centralized solution.
To collect these logs in Azure, deploy the Log Analytics Agent which then allows for utilizing different solutions such as Azure Monitor or Microsoft Sentinel, similar to the approach described in my post on Monitoring Elevated Access.
Conclusion: Passwords Unlocked – Enhancing Security and Empowering Users
Effective password management is essential for maintaining a robust security posture. Without efficient systems like Self-Service Password Reset (SSPR) and powerful tools such as Microsoft Entra Password Protection, organizations risk unnecessary downtime, increased helpdesk workload, and vulnerabilities from weak passwords.
By adopting SSPR, you empower your users to swiftly regain access independently, dramatically reducing the burden on your IT team. While Password Protection, reinforces your defenses by proactively identifying and blocking weak, commonly used passwords based on Microsoft's extensive security intelligence.
Now, continuing our proud tradition, here's your obligatory bad joke:
Why did the password get rejected by the website?
Because it didn't have enough character! 😎
By implementing these best practices, you'll enhance security, streamline operations, and significantly improve user experience across your organization.
As we continue this series, I strongly encourage you to put these recommendations into action.
In our next post, we'll explore secure collaboration configurations within Microsoft Business Premium, helping you ensure collaboration is both productive and secure.
Be sure to bookmark this post for easy reference as we build upon these concepts throughout the series!
🔗 Securing Microsoft Business Premium Series Post Index
Part 04: Passwords Unlocked – Mastering Self-Service Password Reset and Password Protection (You're here!)


Comments